File Backup Service
This page outlines the workflow and requirements for backing up audio preservation files and metadata to the department’s offline storage solution.
The backup service is written in Python 3.x and the code is accessible here.
- Workflow
- Requirements and Data Formatting
- Preprocessing Checks
- Copying Files from Local a Drive
- Postprocessing and Backup Storage
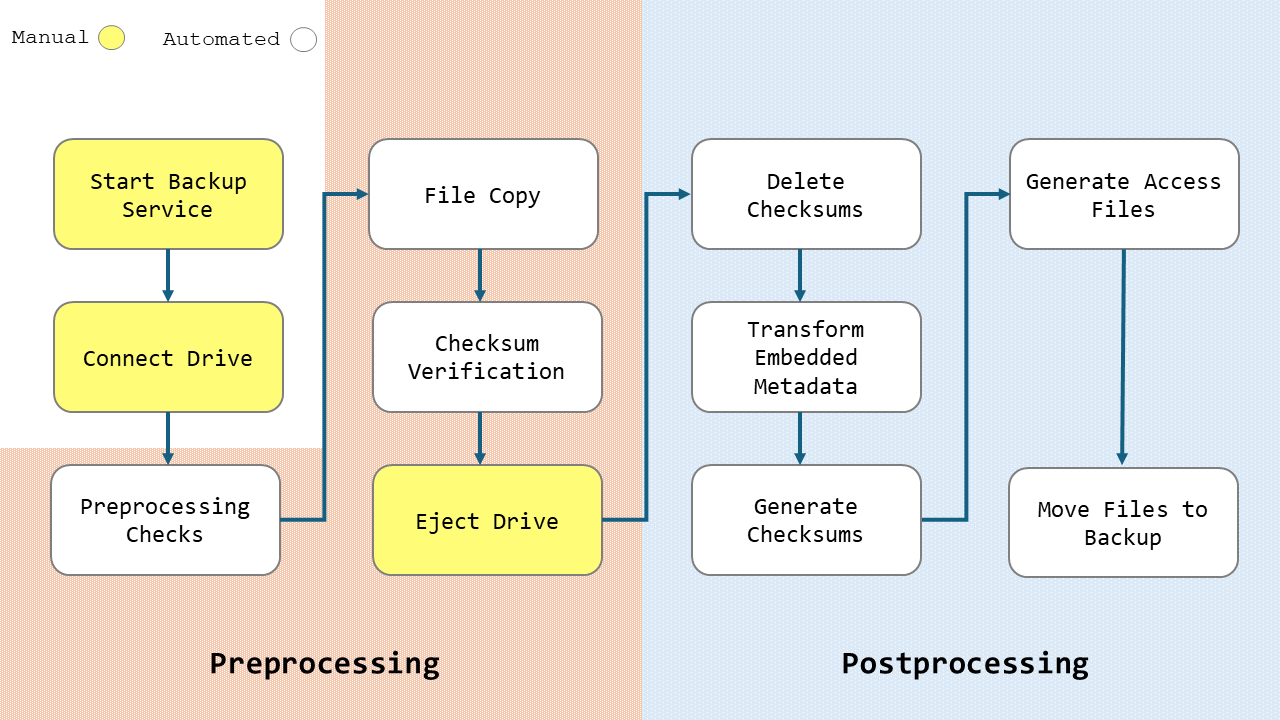
1. Workflow
Outline of the File Backup Service operations.
2. Requirements and Data Formatting
The following data is required to run the backup service.
- Audio files
- MD5 Checksum files
- JSON Process Metadata files
- Excel Batch SIP spreadsheet
All files need to be saved in a source directory named with the engineer’s name (First Surname) and organised in flat structure with no subdirectories.
| Directory | Files |
|---|---|
| /Engineer Name | |
| *.wav | |
| *.md5 | |
| *.json | |
| EnigneerName_Date_BatchNo_ExcelBatchUpload.xlsx |
The Batch SIP spreadsheet is required and all data listed within must match against the audio and process metadata files in the directory.
The spreadsheet should be named according to the filename template:
| Template | Example |
|---|---|
| EnigneerName_Date_BatchNo_ExcelBatchUpload | CarloKrahmer_240307_1_ExcelBatchUpload |
The batch number represents the number of total backups made by an engineer and should increment with each new backup. It does not reset with new collections or date changes.
| Backup Number | Batch Number | Batch SIP filename |
|---|---|---|
| 1 | 1 | CarloKrahmer_240307_1_ExcelBatchUpload |
| 2 | 2 | CarloKrahmer_240410_2_ExcelBatchUpload |
| 3 | 3 | CarloKrahmer_240503_3_ExcelBatchUpload |
3. Preprocessing Checks
When the service begins, the backup requirements outlined in 2. Requirements and Data Formatting will be checked and if any of the conditions are not met, the service will reject the backup and exit.
Therefore, ensure all conditions are met before attempting a backup.
4. Copying Files from a Local Drive
To copy files from your drive to the backup storage
- Double click on the BackupService executable on the desktop
- Read the welcome message and ensure all checks are made
- Connect your drive as requested and hit Enter to continue
- Select the source directory and follow the onscreen instructions
- The data on the attached drive will copy over to the _staging_area directory
- Once the copy has completed and the file checksums verified, you will be asked to eject the drive
- Eject the drive as requested and hit Enter
5. Postprocessing and Backup Storage
Once the intial copy to the staging area is complete and the drive ejected, a series of postprocesses will begin. You do not need to be present for this and can leave the service to complete without supervision.
- Existing checksums will be deleted
- Embedded BWF metadata will be rewritten to the RIFF INFO chunk
- New checksum files will be generated
- Access files will be generated and saved to the _mso_audio directory
- The files will be then be moved from _staging_area to _backup_storage, and saved to the Engineer’s named directory and a batch-number-date named directory created