Raspberry Pi Audio Capture
The Raspberry Pi is a low-cost solution for audio digitisation.
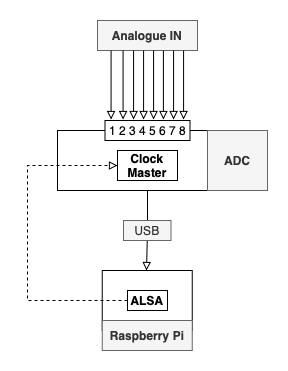
The Raspberry Pi 5 (8GB RAM), running on Raspberry Pi OS, is connected to the Prism Titan ADC via USB. The audio signal is captured and edited using Cockos’ Reaper Digital Audio Workstation (DAW).
1. Prism Titan ADC, USB Mode
To set the Prism Titan to USB Mode, connect it to one of the Raspberry Pi’s USB ports and press and hold the large volume nob on the front panel until the light flashes. The Prism Control Panel does not run natively on Linux so the ADC settings (clock, channel inputs etc.) must be set in Reaper.
Prism’s Verifile is compatible with USB mode and runs on the Pi using the Wine compatibility layer. Audio files should be verified in Verifile after each transfer to ensure they have no drop-outs. See 2. Prism Sound Verifile Checker for details.
2. Reaper
Cockos’ Reaper is an affordable, fully-featured DAW that runs natively on Linux.
2.1. Capture Settings
Hardware
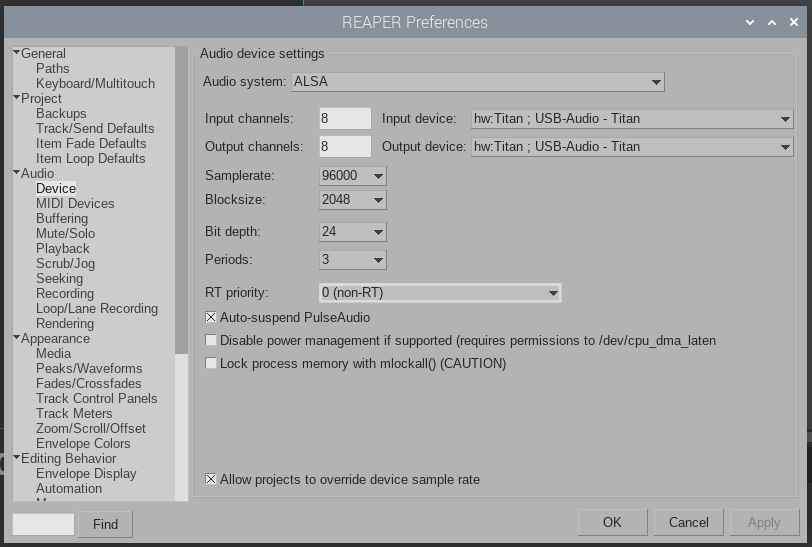
Open Options > Preferences > Audio > Device and set the following settings for the Titan:
| Audio System | ALSA |
| Input Device | “hw:Titan ; USB-Audio - Titan” |
| Output Device | “hw:Titan ; USB-Audio - Titan” |
| Samplerate | 96000 |
| Blocksize | 2048 |
| Bit Depth | 24 |
File Settings
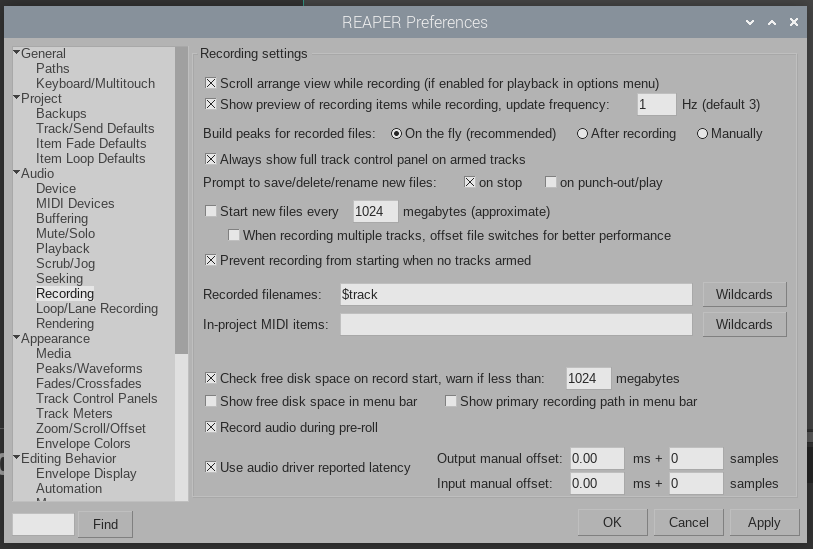
Open Options > Preferences > Audio > Recording
Set “Recorded Filenames” so each file is named according to the name set in the corresponding Track in the Timeline:
| Recorded Filenames | $track |
Ensure “Start new files every 1024 megabytes” is unchecked
Due to the limited onboard stoage allocated to the Pi, files are recorded directly onto External SSD drives, connected via high-speed USB 3.
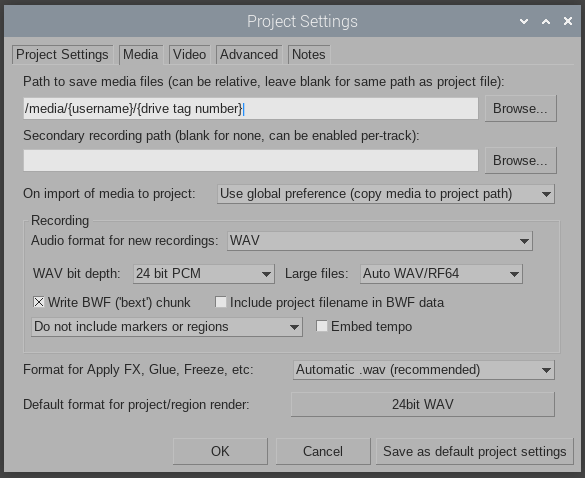
To set the file save location, open File > Project Settings > Media
Click “Browse…” under “Path to Save Media” and navigate to the attached SSD storage under “/mount/{username}/{drive tag number}”
Set the following under the Recording settings:
| Audio format for new recordings | WAV |
| WAV bit depth | 24 bit PCM |
| Large files | Auto WAV/RF64 |
| Write BWF (‘bext) chunk | ✅ |
2.2. Editing and Exporting Files
Reaper uses a non-destructive editing system, so files trimed in the timeline after recording must be exported as new files. There are several ways to do this but the simplist is to use the Consolidate/Eport Tracks function.
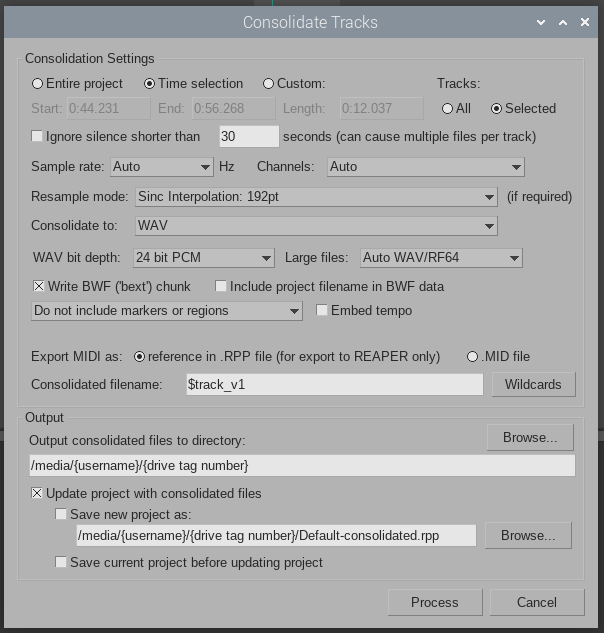
Open File > Consolidate/Export Tracks from the top menu and set the following Consolidation Settings:
Set the following in the Consolidation Settings:
| Time selection | ✅ |
| Tracks > Selected | ✅ |
| Consolidate to | WAV |
| WAV bit depth | 24 bit PCM* |
| Large files | Auto WAV/RF64 |
| Write BWF (‘bext) chunk | ✅ |
Ensure “Ignore silence shorter than:” is unchecked
*Note - update as required to match source file
To edit and Consolidate/Export files in the Timeline:
- Select the audio file for edit in the Timeline
- Select the IN point for edit and press “s” on the keyboard, this will split the file, repeat for the OUT point
- Highlight the file on the Timeline
- Right click on the Timeline’s top Time Ruler and select “Set Selection to items” from the menu
- Right click the edited file and select File > Consolidate/Export Tracks from the menu
- set the export path under the Output settings
- Press Process
2.3. Additonal Settings
- Turn off copying files when imported into Reaper.
Open File > Project Settings > Media and set:
| On import of media to project | Do not copy media to project path |